Butter Chicken is very famous in our house. Almost every occasion, we have butter chicken and naan as one of the main dishes. This recipe is sooo easy and takes no time to fulfill your cravings!
Disclaimer – This is not my recipe. However, I’ve modified to my taste.
Butter Chicken is very famous in our house. Almost every occasion, we have butter chicken and naan as one of the main dishes. This recipe is sooo easy and takes no time to fulfill your cravings!
Servings 4 | Prep time 15 min | Chicken marinate time 2-3 hours | Cook time 20 min
Ingredients: – 3 Chicken Breasts – 1 ½ cup Greek Yogurt (you can use regular too) – 1 cup Tomato Paste – Half cup Lemon Juice – 5 tablespoon Butter – 1 cup Half & Half Cream – 1 cup Olive Oil
Chicken Marinade Masala Ingredients:
– Salt to taste (recommended 2 teaspoon)
– ½ tablespoon garam masala – 1 tablespoon chili powder – ½ teaspoon dried fenugreek leaves – 1 teaspoon ginger paste – 2 teaspoon garlic paste
Step 1: Chop the chicken into cubes and marinate the chicken in a bowl with 1 ½ cup of Greek yogurt, half cup lemon juice and chicken marinade masala for 2- 3 hours. If I am not in rush, I marinate the chicken over night. Cover it and leave it in the fridge.
Step 2: In the skillet at medium heat, add 1-cup Olive oil and add the chicken cubes. Cook approximately for 10-15 min.
Step 3: While chicken is cooking, in the same pan, add the tomato paste, half and half cream, and let it simmer for 5-7 minutes. Make sure you stir the chicken so the tomato paste is well mixed with the chicken.
Step 4: Once its nicely mixed and the chicken is cooked, add in the butter. Bring it to boil and then reduce the heat to a simmer for 5 minutes.
THAT’S IT!
Tips: – Marinate the chicken over night, if possible.
– Use Fresh Chicken.
– Take the marinated chicken out of the fridge 30 mins prior to cooking.
Sleep training is very personal to every family. Honestly, I had no idea what it was or how it’s done till I was three months into motherhood. I had completely given up on my sleep. I was maybe getting one or two straight hours of sleep.
Disclaimer: I am not an expert in sleep training. This is simply my journey.
Sleep training is very personal to every family. Honestly, I had no idea what it was or how it’s done till I was three months into motherhood. I had completely given up on my sleep. I was maybe getting one or two straight hours of sleep. I didn’t even remember what sleep over 3 hours felt like. In month three, sleep regression began and that’s when everything went downhill.
Just to survive nights with my baby, I would do anything and everything – rocking him to sleep, giving him a bottle every time he cried, gave him a soother or even bringing him in bed with me (that totally didn’t work).
After four months of surviving being mom, I was loving it, but I was always sleepy and tired. I wasn’t in the moment with my son or with my husband. My husband and I were playing tag (he sleeps and I take care of the baby and vice versa).
I remember talking to one of the moms I met at play date and she had mentioned she was thinking to sleep train her baby. So then I started my research and then joined sleep-training group on Facebook. I got tons of information and through my internet research, found some pros and not many proven cons so I decided, that I was going to commit and sleep train my baby. I didn’t care what anybody would think of this idea as long as my husband was in.
I spoke to my husband and I remember without any hesitation he said YES! I think more than me he wanted this but was secretly waiting for me to make this decision my own.
I waited 5 months for my doctor’s appointment to get OK from my sons’ doctor to see if I can let my baby sleep all night without milk.
Once, I got the green light, it took me ONE MONTH to prepare myself mentally. Yes!!! You heard it right …I was sooooo nervous. But I was determined to take my life back.
We used a method called The Sleep Wave from a book called The Happy Sleeper and it worked magically for us. I was so nervous to sleep train but am so glad we did. This is essentially the method:
First come up with a “script” that you will say to your baby every time you put them down in their sleep spot (crib, bassinet). We said “Faris it’s bedtime. Momma and Baba love you very much. Go to sleep sweetheart”
Now here are the steps…
Do your usual bedtime routine, place baby in their crib drowsy but awake, say your script and walk out the room
If the baby starts crying, truly crying and not just fussing or squawking (use your best judgement) then you set a timer for 5 minutes. If they are still crying after 5 minutes, go in, say the script and leave (do not touch them or console in any way, just look at them, say your script and leave) – so caveat I did put my hand on him when I said the Script cause we had been practicing that for a few weeks.
If the baby continues to cry set the timer again for 5 minutes and keep doing the 5-minute checks and saying the script until the baby stops crying.
Once the crying stops but it starts again in the middle of the night then you do the same thing again. Start the timer for 5 minutes and go from there. Remember if the baby stops crying at any point then to reset the timer (even if they stop crying for only 30 seconds).
It doesn’t just have to be one person going in and doing these checks/saying the script (my husband and I took turns) but just make sure your script never changes and that you’re going in at exactly the 5 minute mark and only staying in the room long enough to say the script and walk out. This method is nice because the baby gets used to your pattern of returning every 5 minutes and doesn’t get frustrated like they might If you were increasing the time between checks.
There you have it! I hope some of you found this blog helpful!! Let me know in the comments if sleep training worked for you!
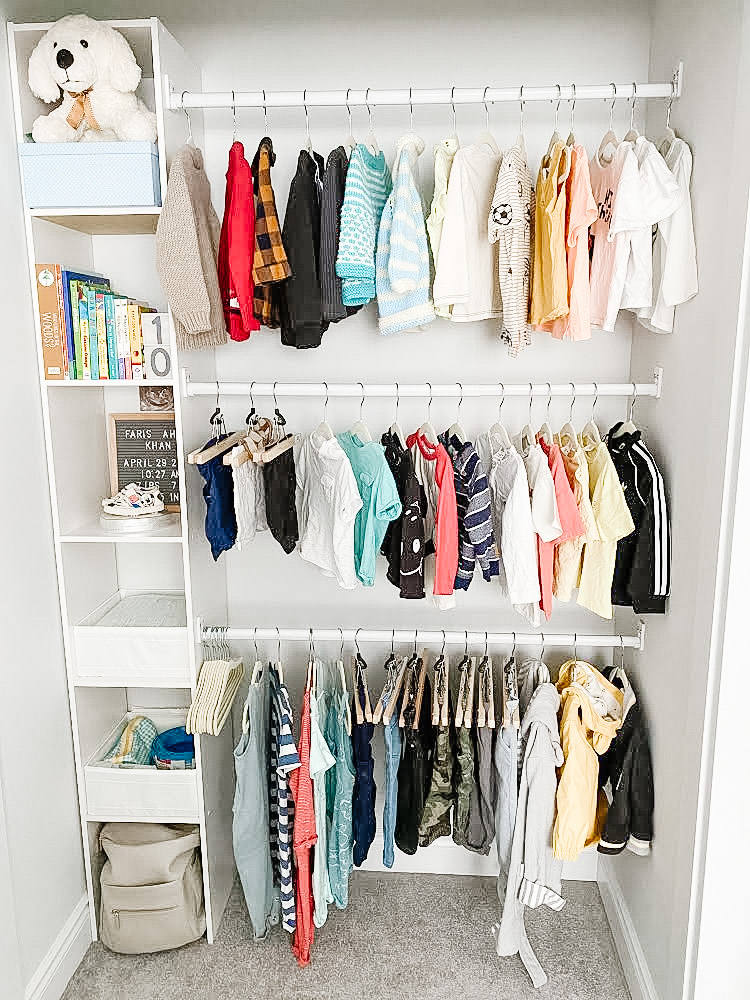
I wanted a baby closet but at the same time I wanted a closet that could work for him in the future. So I made sure to have three rods, low enough so that I could hang his small clothes.
I wanted a baby closet but at the same time I wanted a closet that could work for him in the future. So I made sure to have three rods, low enough so that I could hang his small clothes.
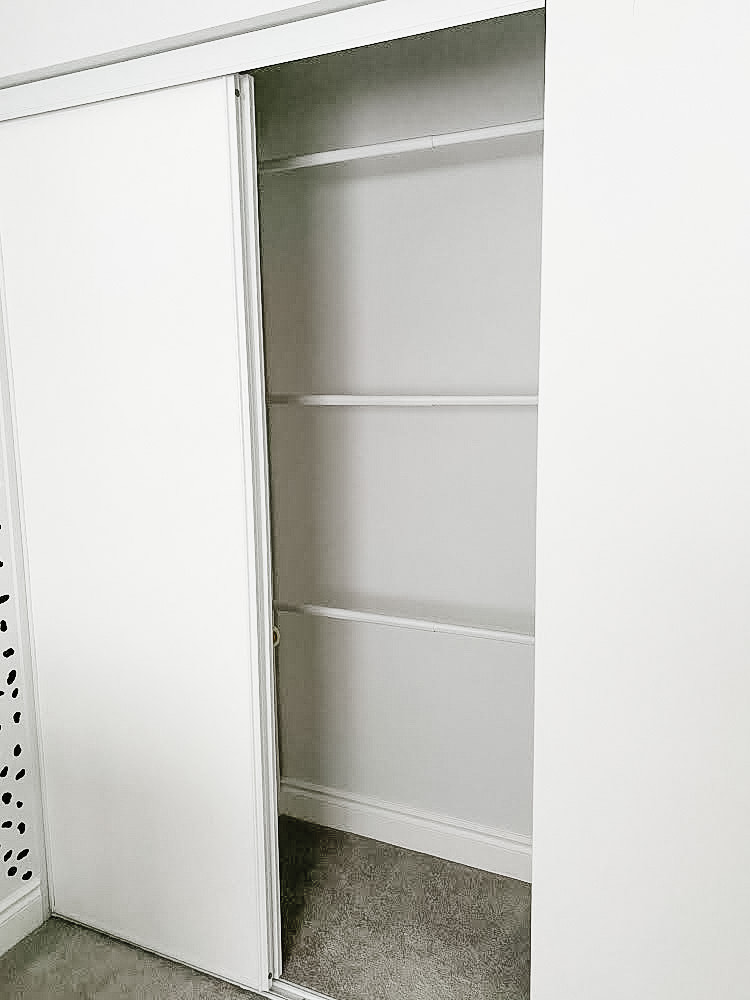
I am not too sure why home builders install sliding doors on almost all bedroom closets. I initially wanted to install an Ikea built-in closet system with drawers, but I couldn’t because you can never fully open the closet doors.
After removing the original rod and the upper shelf had to do some patch work (mudding, sanding it down, and then painting) inside the closet.
I didn’t want to spend a lot of money on the closet, so I bought the Closet Maid unit from Canadian Tire. its 12-inch closet tower kit that creates up to 5 ft of shelf space and 12 ft of hanging space. It’s easy to adjust rods and shelves.
My plan was to have three rods and some shelves on the left side, so I can easily slide the sliding door to have access to his clothes and the shelves.
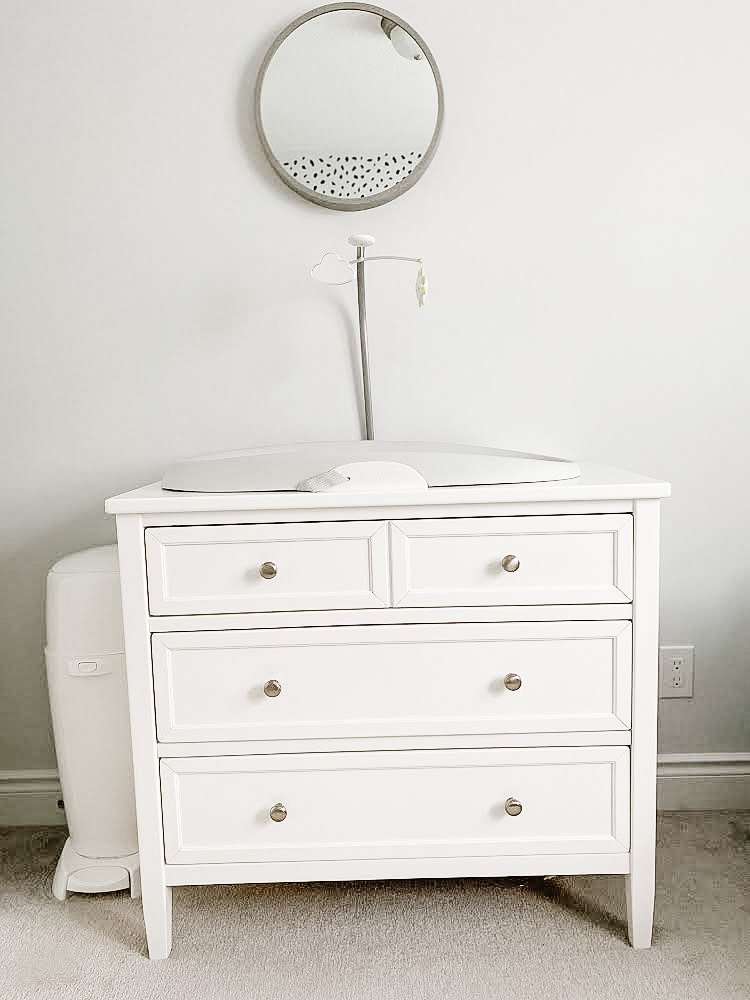
I wanted to have small dresser in my son’s nursery so that I could not only use it for organizing his clothes but also his changing table. The first drawer is organized with his diapers, wipes and loose items such as soother, teething meds, and wash clothes. Very easy to access to these items when I am changing and best part – it’s all hidden in the drawer.
There you have it! I hope some of you found this blog helpful!! If you have any tips and tricks for closet storage, make sure to share them in the comments below!
Yes, you read it right! I am going to show you how you can refresh your bedroom with 5 things that will make your room looking Instagram pic worthy!
Yes, you read it right! I am going to show you how you can refresh your bedroom with 5 things that will make your room looking Instagram pic worthy!
1. Add or swap accent pillows
Accent pillows play a very big role when it comes to first impression. Not only are they a large square piece of decor but they are also the perfect accessory for your bed. Pillows give you that welcoming vibe. I found affordable pillows that can WOW your space.
That’s right…It’s time to move on…I am talking about the pictures hehe. Living in this social media world, we take at least four pictures a week (and obviously one is totally a selfie LOL!). So, why not update your picture frames. Very cost effective yet bring a fresh and new change in your room.
I am ALL about real flowers. There is just something about fresh flower that brighten up your space and bring joy in the bedroom. The fresh flower scent always brings that good-feeling vibe to the room.
I am sure you all know the feeling getting in bed with fresh clean sheets. So, this is exactly that!!… easiest and fastest way to bring your bedroom a refresh. Tip: Match your duvet with your sheets, or sheets should be lighter than the duvet.
Add new objects in your room. It can be indoor plant, tray for your dresser, or floor lamp. These items may not be for everyday use, but they give your room a new look without breaking your budget.